Overview
OFH works on many different types of projects, each with its unique goals and deliverables. For illustration, here is a breakdown of a lens design project from 2012.
Our client produced a very low cost diagnostic microscope to view saliva with 30x magnification. They came to OFH to help them design a new product with higher magnification.
Production cost and volume dictated that injection molded plastics would be used for device and lens elements manufacturing. While a 50x magnification was the most important new specification, we worked with the client to define all specifications prior to starting the design process. We needed to ensure that the requirements a.) don’t break the laws of physics, b.) could be produced using existing manufacturing technology at a low cost and c.) described a product that would meet market demands.
The initial specifications included:
- Visual Field of view 30°-40°
- Object circle diameter .6mm-3.6mm
- Focal length of the eyepiece – 5mm-6mm
- Diameter of the eyepiece (mechanical) – 25mm-35mm
- Length of the eyepiece – 20mm-30mm
- Eye relief – 4mm-5mm; (defined as distance between viewer pupil and last element)
- Pupil diameter – 2mm-3mm. (defined as visual location plane of user eye)
- Depth of field – +/- 0.025 mm (theoretical value, actual value determined in design)
- Fixed Focus
- Resolution- TBD testing required
- Distortion- TBD testing required
We also discussed the expected costs for prototyping and production and how those costs might be impacted by the desired specifications.
The client was not able to specify two key performance requirements, resolution and distortion. We therefore began the program by testing a product the client felt had a ‘good enough’ performance and we measured that product’s resolution and distortion .
The project task list looked like this:
- Testing of existing products
- Optical design of the eyepiece using Zemax
- Tolerance study
- Opto mechanical design of the eyepiece
- Development of manufacturing documentation
- Prototyping and then transfer to manufacturing
Task 1: Testing
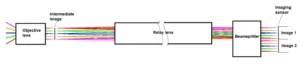
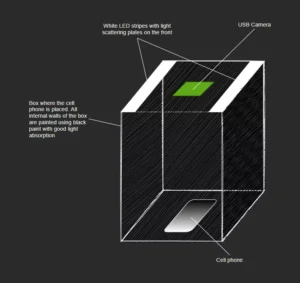
In our lab we tested the sample lens. The slide below shows a resolution measurement using different green and white light.

Measurements of resolution using different green and white light.
Since we knew the client felt whatever the sample lens produced was good enough, we now had the full requirements
Task 2: Design of lens
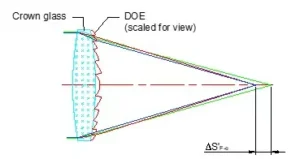
Using Zemax, we modeled different optical concepts for a new eye piece. We also looked at how image quality would be improved if a diffractive optical element (DOE) was used in the layout.
")
Task 3: Opto mechanical design
The tolerancing of the elements and the opto-mechanics go hand in hand. There are trade offs that can provide looser (less assembly cost) opto-mechanical tolerances and tighter (more expensive) lens element tolerances. At this point, we know the basic design of the elements shows two different opto mechanical layouts.
One uses gluing while the other relies on springs. At this stage of the project, the lens manufacturer’s input becomes more important. Their feedback on preferred assembly methods will determine the design path. Below are two of the three concepts OFH presented.


Task 4: Documentation
After our discussions with the manufacturers, a design approach was selected and OFH prepared design documentation suitable for prototyping. One of the lens element drawings is shown below. Note this is not the full drawing

Need assistance designing a custom optic or imaging lens ? Learn more about our design services here.
Task 5: Prototyping and transfer to manufacturing
At this point, the project moved from ‘typical’ to ‘atypical.’ The client decided they no longer had the funds needed to prototype with diamond turning nor those the expenses related to making a custom molding tool. The market opportunity they saw for the new 50x lens did not turn out to be as large as they expected and would not support the additional cost required to move from a 30x lens to 50x lens and so the project was shelved.
This was frustrating for everyone involved. We’d love to see every design we work on go to production and reach the market, but it doesn’t always happen that way. Corporate priorities change; managers and internal cheerleaders take new jobs. The needs of our clients and their customers are never static. It’s part of the life of being in the business of contract optical engineering.