Expert Relay Lens Design
for Complex Optical Systems
From borescopes to endoscopes and telescopic sights — we design precision relay lens systems that transfer images without distortion, tailored to your exact specifications.
- 800+ Optical Systems Designed
- NIR & Visible Wavelengths
- Zemax-Verified Designs
1:1 Image Relay
Precision magnification matching with minimal image degradation across the full optical path
Zemax Optimization
Every relay design is modeled and optimized in Zemax for aberration control and MTF performance
Design to Prototype
Complete service from optical design through opto-mechanical housing and working prototypes
NIR & Multi-Spectral
Expertise across visible, NIR (900–1700 nm), and thermal wavelength ranges
- Alex
- lens design, optical design, optics consulting
Introduction
Optical relays, an integral component of various optical systems, play a crucial role when the user’s proximity to the observed object is limited or when specific image transformations are required. A prevalent example of this is found in relay lenses, often employed in scenarios where physical closeness to the object is impractical, as seen in applications like endoscopes and borescopes.
Additionally, relay lenses find utility in situations where image inversion or rectification is necessary, such as in telescopic sights. This article delves into the field of optical relays, focusing on the design steps taken to create a customized borescope for a client.
The exploration encompasses the unique challenges and considerations involved in tailoring an optical relay system to meet specific requirements, shedding light on the sophisticated engineering behind these crucial optical components.
Basics of Relay Lenses
A relay lens is a fundamental optical component designed to relay images from one location to another within an optical system. Comprising at least two lenses, the relay lens works by capturing an image produced by an initial optical element, such as an objective lens, and transmitting it to a subsequent location without significant loss of image quality.
In a relay lens system, the relationship between the object space (where the original image is formed) and the image space (where the final image is observed or captured) is crucial. The first lens captures the image in the object space, and the subsequent lens or lenses transmit this image to the image space without significant distortion.
One noteworthy application of relay lenses is addressing image inversion or rectification. For example, in rifle scopes, the image formed by the objective lens is often inverted. The relay lens corrects this inversion, ensuring that the observer sees an upright image. This correction is essential for providing accurate and comfortable visual representation.
What is a Borescope?
Borescopes are usually used when there is a need to inspect narrow or difficult access locations. They can be made with rigid or flexible components with an objective lens on one end and a camera or eyepiece on the other.
In order to design (or choose the correct) objective lens, there are different parameters that need to be specified by the client: the field of view, the image size, and the wavelength range.
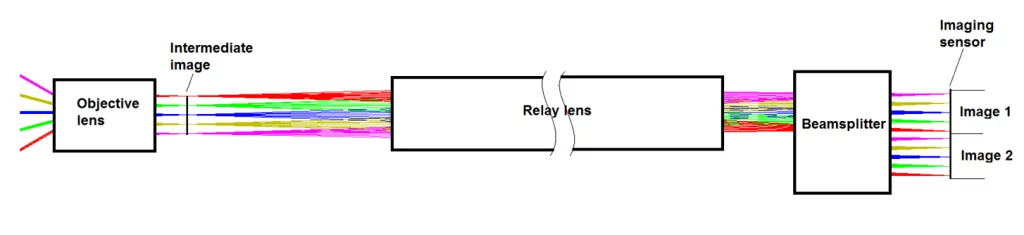
An objective lens creates an intermediate image that is picked up by a relay lens and is then translated to the other end of the borescope where a camera (or eyepiece) is located. The camera then displays the image on a screen (or the observer’s eye) for viewing.
The objective lens is the key part of the borescope system. The objective lens forms the initial image and provides the needed optical parameters and image quality. We designed this objective lens based on the client’s requirements of resolution, FOV, wavelength range (900–1700 nm in this case), and working distance. During the optimization stage, we carefully pick the best materials to reduce the amount of aberrations.
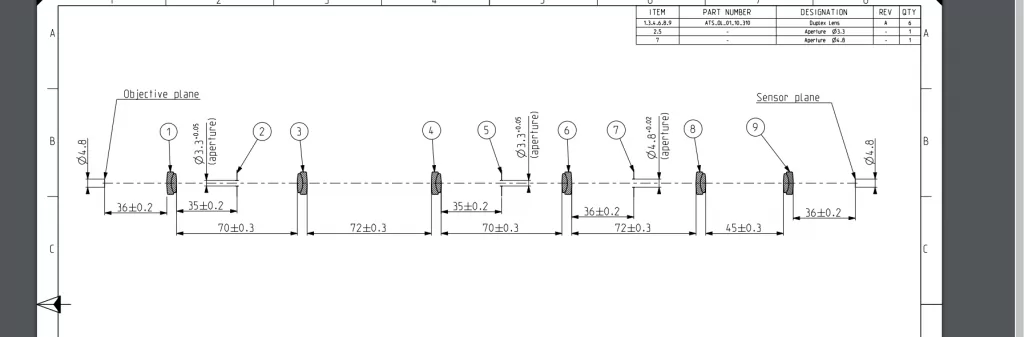
The borescope required an extension between 400–600 mm: instead of creating a single relay lens for the total length, we divided the length into 4–5 unit elements. That is, 4 or 5 relay lenses with an extension of 100–150 mm each, concatenated one after the other to achieve the required borescope length. The relay lens translates an image with a 1:1 magnification, while the aperture of the designed relay lens coincides with the objective lens.
One advantage of this relay lens system is that, if the borescope needs to be extended further (or shortened), additional relay lenses can be added (or removed) without any change to the other optics in the system.
The final optical design step is adding a camera (or eyepiece) to observe/record the image. We carefully check the aberrations and MTF curves at every step — after the objective lens and after adding the relay system. Optimization is done using Zemax, and suggestions were made to the client about how to display the images and adjustments on the objective lens.
When the optical design is complete, the design is passed on to the opto-mechanical engineer who designs the lens housing and prepares the optics manufacturing drawings.
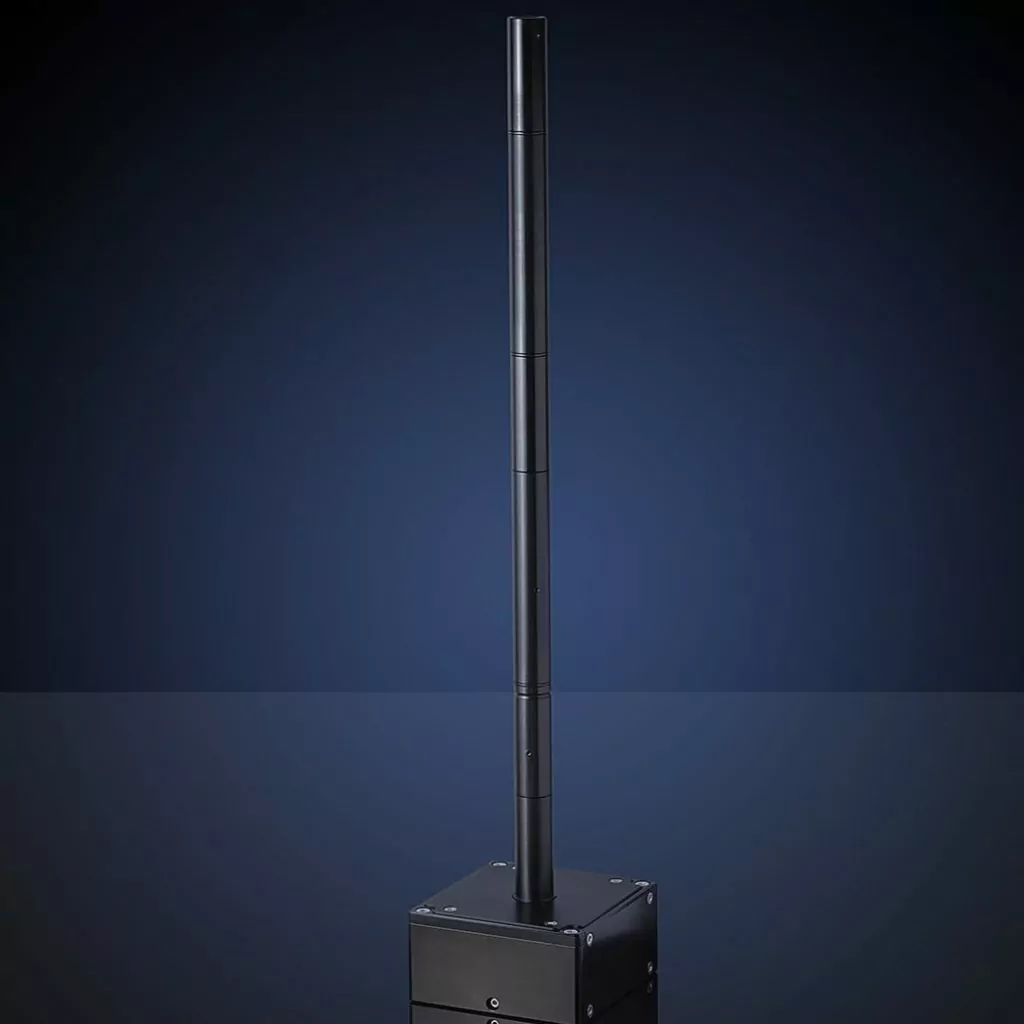
When the optical and mechanical designs are complete, it’s time for prototyping. The finished product of camera, relay lens, and objective lens is seen below.
Need a Custom Borescope or Relay Lens System?
Our engineers have designed relay systems for NIR, visible, and thermal applications.
Distinguishing Relay Lenses from Other Lens Types
While various types of lenses serve distinct functions in optical systems, relay lenses stand out for their specific role in image transfer and reproduction.
1. Purpose and Function
Relay Lenses
Primarily designed for transferring images from one location to another while maintaining or altering the image characteristics. They are specialized for relaying images over a distance.
Standard Lenses
Typically used for general photography with a fixed focal length. They are not inherently designed for image relaying but rather for capturing images directly.
2. Image Inversion and Rectification
Relay Lenses
Often employed to correct image inversion or rectify images, ensuring that the observer sees an upright representation. This correction is crucial in applications like telescopes.
Standard Lenses
While they can capture images with high clarity and resolution, standard lenses do not inherently address image inversion or rectification.
3. Configuration and Design
Relay Lenses
Consist of at least two lenses arranged to capture and reproduce images along an optical path. The strategic placement allows image transmission without significant distortion.
Specialized Lenses
Different types like fisheye or macro lenses have specific designs tailored for unique applications, such as capturing wide-angle scenes or extreme close-ups.
4. Application Focus
Relay Lenses
Often utilized where the observer cannot be physically close to the object, as in endoscopes, or when specific image transformations are needed, as in telescopic sights.
Macro / Zoom Lenses
Primarily designed for capturing detailed close-ups or adjusting focal lengths to zoom in on distant subjects.
Not Sure Which Lens Configuration You Need?
Our team can help you determine the optimal optical design for your application.
Recent Innovations
In recent years, the field of optical technology has witnessed remarkable advancements, contributing to enhanced imaging capabilities and novel applications across various industries.
One notable innovation lies in the integration of advanced materials, particularly metamaterials, into optical systems. Metamaterials offer unprecedented control over light properties, enabling the design of lenses with unique functionalities, such as flat lenses that can focus light without the need for curved surfaces.
Another significant innovation is the widespread adoption of 3D printing in optics. The application of additive manufacturing techniques allows for the creation of complex and customized optical components with improved efficiency and reduced costs. This not only accelerates prototyping processes but also opens up possibilities for designing intricate relay lens configurations that were previously challenging to manufacture.
The convergence of artificial intelligence (AI) and optical systems has ushered in a new era of smart optics. AI algorithms are being integrated into optical devices to enhance image processing, object recognition, and adaptive optics. This synergy has proven particularly valuable in applications like autonomous vehicles, medical imaging, and surveillance systems.
Advancements in miniaturization have also made a significant impact. Smaller and more precise optical components are being developed, leading to the creation of compact imaging devices for medical diagnostics, telecommunications, and consumer electronics.
Conclusions
Relay lenses are optical components designed to transfer images from one location to another while preserving or modifying specific optical characteristics. Typically consisting of at least two lenses strategically positioned, relay lenses play a crucial role in scenarios where the observer cannot be physically close to the object being observed or when specific image transformations are needed.
Their versatility extends to applications like endoscopes, telescopic sights, and other optical systems requiring precise image relay across distances. At Optics for Hire, we bring deep expertise in designing custom relay lens systems — from initial concept and Zemax modeling through opto-mechanical design and prototyping.
In This Guide
Need a Relay Lens Designed?
Talk to our optical engineers about your project requirements.
Thermal Imaging Borescope Design
How we designed a modular relay lens system for a NIR borescope with 400–600 mm extension.
Client Requirements
NIR wavelength range (900–1700 nm), 400–600 mm extension, specific FOV and resolution targets for narrow-access inspection.
Modular Relay Design
Divided the optical path into 4–5 unit relay elements (100–150 mm each) for a modular, extendable system with 1:1 magnification.
Zemax Optimization
Verified aberration control and MTF performance at each relay stage. Selected optimal materials to minimize chromatic and spherical aberrations.
Prototype & Delivery
Completed opto-mechanical design, manufacturing drawings, and delivered a working thermal imaging borescope prototype.
Ready to Design Your Relay Lens System?
Whether you need a borescope, endoscope relay, or custom image transfer system — our optical engineers can take your project from concept to working prototype.
Where Relay Lenses Are Used
Relay lens systems are critical components across industries requiring precision image transfer over distance.
Industrial Borescopes
Inspect turbines, engines, and confined spaces with rigid or flexible relay systems.
Medical Endoscopes
High-resolution image relay for minimally invasive surgical and diagnostic instruments.
Telescopic Sights
Image inversion correction and erecting systems for rifle scopes and spotting optics.
Machine Vision
Relay optics for automated inspection, quality control, and industrial imaging systems.
Periscope Systems
Extended viewing systems for defense, submarine, and security applications requiring offset viewing.
Thermal Imaging
NIR and SWIR relay designs for thermal cameras, FLIR systems, and night vision devices.
Relay Lens Design FAQs
What is a relay lens and its primary function?
A relay lens is used in optical systems to transfer an image from one point to another without distortion, preserving image quality over distances. They are essential in endoscopes, borescopes, telescopic sights, and any system where the observer is physically separated from the object.
How does relay lens design impact image quality?
The design of relay lenses greatly affects image clarity, resolution, and field depth. Proper material selection, aberration correction, and Zemax optimization ensure each relay stage maintains MTF performance, making them critical for applications requiring high-fidelity image transfer.
Are relay lenses applicable in both digital and analog systems?
Yes, relay lenses are versatile and can be used in both digital and analog imaging systems. Whether the final image is captured by a digital sensor, displayed on a screen, or viewed through an eyepiece, relay lenses serve the same fundamental role of transferring images across the optical path.
Can relay lens systems be extended or shortened?
Yes — a well-designed modular relay system uses unit relay elements that can be added or removed without changing the rest of the optics. This is exactly the approach we used in our borescope project, where 4–5 relay units of 100–150 mm each provided a flexible, extendable solution.
What wavelength ranges can relay lenses be designed for?
Relay lenses can be designed for virtually any wavelength range, from UV through visible to NIR and thermal infrared. Material selection and coating specifications are tailored to the target wavelength — for example, our thermal borescope project required 900–1700 nm optimization.
Need a Custom Relay Lens Designed?
Tell us about your project and we'll schedule a review. We strive to provide valuable engineering insight before a formal collaboration begins.
Call Us
Email Us
Location
Boston, MA Area
Request a Project Review
Your information is confidential. We respond to every inquiry personally.